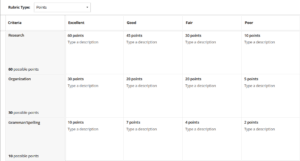
The Blackboard rubric tool lets you set up a grid composed of rows of evaluation criteria and columns of evaluation categories. You can create as many rubrics as you wish, and assign them to any gradable item in Blackboard, such as assignments, graded blogs and wikis, graded discussion forums, etc. Once assigned to a gradable item, you can use the rubric in the grading. For instance, in grading an assignment, you can grade directly in the rubric, assigning points or percentages and providing feedback for each cell in the rubric. You also have the option of making the graded rubric available to students. Here is an example:
Creating a Rubric
- From Gradebook, click on the Settings Gear.
- Scroll down to Course Rubrics and Click Create.
- Now edit the default rubric to your specifications.
Editing the Rubric
- Choose a Rubric type from the drop-down list:
- No Points: Feedback only
- Points: Single point value for each Level of Achievement.
- Point Range: Range of values for each Level of Achievement
- Percent: Flexible depending on each assignment’s possible points
- Percent Range: Range of values for each Level of Achievement.
- Click Trash Can icon to delete any row or column.
- Click + between rows/columns to add a new criterion, or to add a new achievement level
- Click Pencil icon from any contextual menu to change the text information (row/column label, points/percent, descriptions).
- Click Save when completed.
*PLEASE NOTE:
Each cell has a 1000-character limit.
Once a rubric is used for grading, you cannot edit it. You can copy the rubric to create a duplicate that you can edit.
Assigning the Rubric to an Assignment
When creating an Assignment, Discussion, or Journal, you can create a Rubric or assign an existing Rubric. Click on the Settings gear.
Additional References
Instructions for using Rubrics in Blackboard
Blackboard Rubrics in Ultra (Printable PDF)
Quick videos on using rubrics
Creating a Grading Rubric
Create a Rubric using the AI Design Assistant
Grading with Rubrics