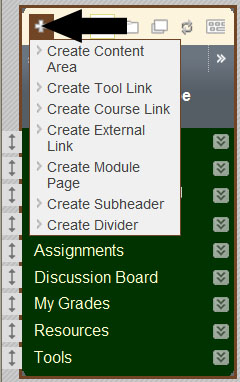
Instructors can customize their Blackboard course navigation menu by clicking on the “+”. Instructors can create a navigation menu specifically for each course with titles and functions of their choice. This feature creates additional content areas and adds tool functions to the navigation menu. Instructors can also rename any of the navigation buttons/links.
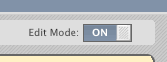
Any time you want to make changes to your Blackboard course, be sure that Edit Mode is
turned on. The button will be located near the top right of your screen. Toggling the
Edit Mode to "Off" will give you a student view.
1. To edit an existing link in the Course Menu, click on the double down arrow, or chevron, to the right of the item.
2. To reorder Course Menu items, click the arrows at the left of the item and drag it to the desired location.
3. If the Content Area contains no content, an icon of a dotted square appears (as in Course Information in the image below).
4. If the Content Area is unavailable to students, an icon of a square with a line through it appears.
![]()
5. To add buttons to the menu, hover over the “+” in the upper left corner of the menu.
Creates a folder, or container, for documents and/or tools:
1. Hover over the “+” in the upper left corner of the menu and choose Content Area. A window will popup asking for a name for the content area.
2. Choose if you want to make this link Available to Users.
3. Click Submit.
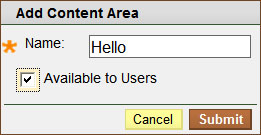
4. Click on the name of your newly created link to begin adding to this Content Area folder.
Creates direct links to function areas, Discussion boards, Email, Tasks, etc.
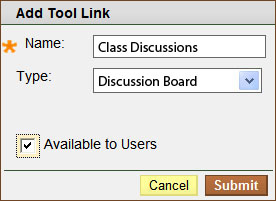
1. Hover over the “+” in the upper left corner of the menu and click on Tool Link.
2. Enter your name for the tool link.
3. From the drop down box, choose which tool you want to link to.
4. Choose if you want to make this link Available to Users.
5. Click Submit.
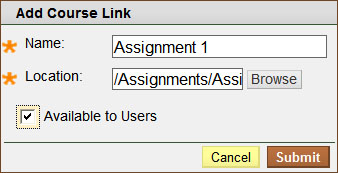
1. Hover over the “+” in the upper left corner of the menu and click on Course Link.2. Name the link.3. Click Browse and navigate to the course content you want to link to.4. Choose your Available to Users option.5. Click Submit.
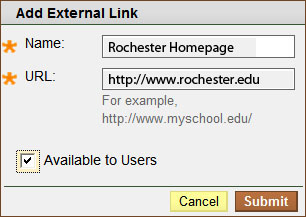
Creates a button that links directly to an outside website:
1. Hover over the “+” in the upper left corner of the menu and click on Web Link.
2. Name the button and type in the full name of the URL.
3. Choose Available to Users
4. Click Submit.
Creates a break on the menu that is just a straight line, very similar to subheader:
1. Hover over the “+” in the upper left corner of the menu and click on Subheader.
2. Name the subheader and click Submit.
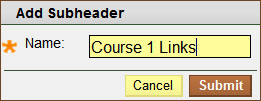
2. A straight line has now been created that you can move wherever you want on the menu.