ULTRA Courses
In Ultra, announcements show up in the Activity Stream, pop up the first time a student enters the courses it is posted in, and are available in the Announcements tab.
- Click the Announcements tab
- If this is your first announcement, click “Create Announcement”. Otherwise click the + symbol in the upper right corner.
- Enter information as needed.
- Note that Title will appear as the header of the Announcement in Blackboard and in the Subject of an associated email.
- Note that Message will appear as the body of the Announcement in Blackboard and in the body of an associated email.
- To generate an email with this message to all users, click the box for “Send an email copy to recipients“
- Note that the course identifier is also always included in the email subject
- The sender’s email will be used as a reply-to address in the email.
- Click Post. The email will be sent immediately and the sender should receive a copy.
If you click “Save Draft”, the announcement will be saved for later posting. Students will not see it until it is posted.
If you choose to “Schedule announcement”, the announcement will post and be sent as email at a later date.
Notifications about unread announcements appear in the tab menu.

ORIGINAL Courses
An announcement in Blackboard is a message that is posted to a specific page – Announcements – and displayed on the Activity Stream. It can also be sent as an email.
To post the same announcement to multiple courses, see Qwickly Course Tools.
- Click the Announcements item in the left menu.
- Make sure that the Edit Mode switch is set to “On” (this makes all the editing tools appear).
- Click the “Create Announcement” button.
- Enter information as needed.
- Note that Subject will appear as the header of the Announcement in Blackboard and in the Subject of an associated email.
- Note that Message will appear as the body of the Announcement in Blackboard and in the body of an associated email.
- To generate an email with this message to all users, click the box for “Send a copy of this announcement immediately“
- Click Submit.
** PLEASE NOTE: Announcements will always display unless otherwise restricted by a date range, most recent on top.
Do not paste text directly from MS Word into Blackboard text boxes. Please see “Using Paste from Word.”
To send the same email to multiple courses, see Qwickly Course Tools.
ULTRA Courses
In Ultra courses, emails are generated as Messages. Messages can be internal to Blackboard, or also be sent as email.
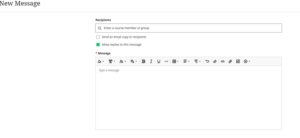
Click on the Messages tab. Click on New Message.
![]()
Fil in the appropriate information.
- Recipients – start typing and student names will appear. Click on them to select them. You can also choose to sent to All Students, All Instructors, Groups.
- Click on “Send an email copy to recipients” if you want this to also go out as email.
- Type your message in the message box.
- Click Send.

ORIGINAL Courses
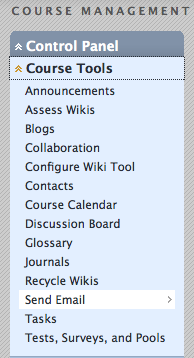
- Click Email in the left hand menu or Under Control Panel, use the Course Tools pull down and choose Send Email
- Pick the option which best suits your purpose.
- All Users will send to everyone enrolled in the course (instructors, course builders, teaching assistants, students)
- All Students will send to only enrolled students
- Single / Select Users will allow you to pick and choose users from a list.
- Single / Select Groups will allow you to pick from previously created Blackboard Groups.
- Enter subject and message, attach file if needed, then click “Submit.”
- You’ll get a copy of the email in your email inbox.
** PLEASE NOTE: this is your only record of the email. No record is kept in Blackboard.
Do not paste text directly from MS Word into Blackboard text boxes. Please see “Using Paste from Word.”
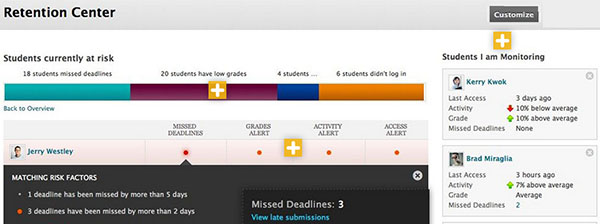
The Retention Center provides an easy way for instructors to discover which students in their courses are at risk. Instructors can communicate with struggling students and help them take immediate action for improvement. The Retention Center replaces the Early Warning System, and will automatically inherit any rules you had set up with that tool.You can begin using the Retention Center features immediately—no setup required.

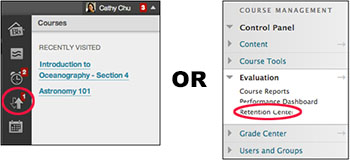
The Retention Center can be accessed from your global navigation links at the upper right of your screen, or from the Control Panel/Evaluation:

