Page Contents
Overview
Use this reference to prepare for registration BEFORE the registration window opens. Preparing saved schedules can help ensure a smooth registration process and improve your chances of enrolling in your desired courses. If you have already built out a saved schedule and want to register from it, please refer to the How to Register from a Saved Schedule page.
If you are looking to directly register for individual courses during open enrollment, please refer to the How to Register for a Course During Open Registration page.
Create a New Saved Schedule
- Log into UR Student using your Active Directory account and password.
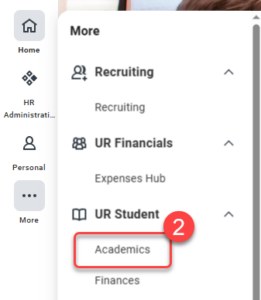
- Navigate to the sidebar on the left, hover over UR Student, then click the Academics app under UR Student. If UR Student is not visible, click the More icon.
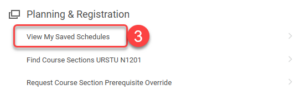
- Under Planning & Registration, click View My Saved Schedules.
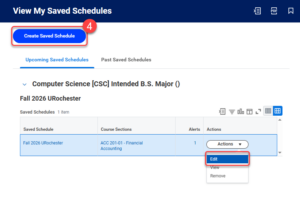
- Select Create Saved Schedule.
Tip: If you want to Edit a pre-existing saved schedule, select Actions within the row of the schedule to edit. From the drop down menu, select Edit.
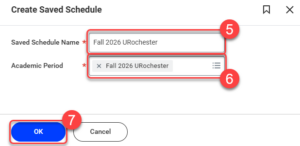
- In the Saved Schedule Name field, enter a name for your saved schedule.
- In the Academic Period field, select a current or upcoming academic period you would like to create the schedule for.
Tip: If you are looking for courses listed under academic periods that are not selectable in this field (e.g. MBI 220 is found on SMD Graduate Education academic periods, but the student can only view AS&E/URochester academic periods), please refer to the Find Course Section page to use the Find Course Sections URSTU N1201 report to create a saved schedule for the academic period. - Select OK.
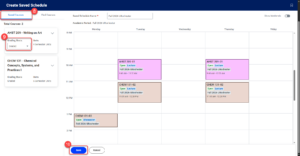
Edit New or Pre-Existing Saved Schedule
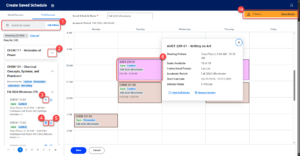
- In the search bar at the top left corner, enter any course subjects or titles to narrow down your search. Select Add Filters, to place additional filters on your search (e.g. the subject, Chemistry [CHEM], can be added to narrow down results).
- Select the up
 and down
 arrow icons next to a course title to expand or collapse a course’s course section offerings.
 - Select the
 icon next to add a course section to the saved schedule.
IMPORTANT: Ensure that you add all required instructional formats (e.g. lectures, labs, workshops, recitations, etc.) and add corequisite courses if required. - Select the
 icon to remove a course section from the saved schedule.
 - Select the
 icon to view the full details of the course section.
 - Select any block within the schedule to display a pop-up showing additional course section details, including the View Full Details and Remove Section buttons.
- If visible, select the Alerts or Errors flag in the top right to view all alerts and errors for the current saved schedule selection.
IMPORTANT: Resolve all alerts and errors before registration to ensure a smooth registration process.
- Select Saved Courses in the top left corner to view courses that are currently on the saved schedule.
- Select Grading Basis and choose Audit or Graded as needed.
- Once all the desired course sections are added for the academic period, select Save.
TIP: If you selected Save, but an Alerts or Errors flag appears in the top right, select Save a second time to save your schedule with alerts or errors. It is important to resolve all alerts and errors before registration to ensure a smooth registration process.
IMPORTANT: Saving the saved schedule does not register you for courses. Please follow the steps on the How to Register from a Saved Schedule page to register your courses based on your saved schedule selection.