Course Management
- Why does my course say "Private"?
When the course shells are created, they are made unavailable to students by default. The courses remain unavailable until the instructors make them available. Instructors (or TA’s or Course Builders) can always access the course. Just click on the link.
To make the course available when you’re ready, click on the three dots on the right hand side and choose “Open course”
- How do I make my course available?
If you see Private next to your course, the course link is not available to your students.
To make the course available when you’re ready, click on the three dots on the right hand side and choose “Open course”
More at Make Your Course Available.
- How do I change the course home page?
You can change the “homepage” or entry point of your course so that your preferred Course Menu item is the opening page:
1. From the Control Panel, use the Customization menu to choose “Teaching Style.”
2.On option #1, choose the Course Menu item you want to be the landing page for the course
3. Click Submit.
More at Change your Course Homepage.
- Can I edit the Course Name (or Course Title)?
Yes – you can change the Course Name (or Title), but not the Course ID.
To change your Course Name:
- In the Control Panel area on the homepage of your course, use the pulldown next to Customization to choose Properties.
- Edit the Course Name
- Submit
- How do I add to, or modify items in the Course Menu?
1. Make sure the Edit Mode switch is “On” (this makes the entire menu and all options visible).
2. Links to areas of the course which are hidden or have no content will display empty or crossed out box icons.
3. Click the chevron to the right of any menu item to see the options for that item.
4. Click the double-headed arrow to the left of any menu item to drag-and-drop it to a new location.
5. Click the plus sign in the upper left of the Course Menu for options to add content areas or links.
6. Click the “Edit Mode” switch to “Off” when you are done to see how this looks to students.For more information, see the step-by-step guide: Managing the Course Menu
- I teach multiple sections of one course - how can I get them all combined into one Blackboard course?
Send an email to your Blackboard support team. Ask to have the course enrollments combined, listing the courses by name and section number. (e.g., all my CHM132 sections for X semester). See Course Creations for more details.
- I am teaching a course that does not appear in Blackboard - how can I get it created?
The automated process that creates Blackboard courses each semester filters out certain courses, e.g., workshops, 0- or variable-credit courses, PhD Readings, Continuous Enrollment, Independent Study, etc. See Course Creations for more information.
If you are teaching a course that has been filtered out and you would like to use Blackboard, send an email to your Blackboard support team. State the name (subject and number) and section number of the course you would like created.
Course Content
- How do I add files or content to my course in Blackboard?
How do I add files or content to my course in Blackboard?
-
- Make sure the Edit Mode switch is “On” (this will display all content areas of the course, even those which are unavailable or have no material in them).
- Go to the content area in which you wish to add your material (e.g., upload a syllabus).
- Click the “Build Content” button and choose Item to upload a single document (and/or type in text) or File (to just link to a file).
- Type in your text in section 1 (if you chose Item) then Browse attach the document you want to add.
- Set options as needed and click “Submit.”
- To add a folder, choose Content Folder, under the New Page column in the Build Content menu.
- For tests, surveys, or assignments, click that option under the “Assessments” button menu.
- Choose discussions, blogs, wikis or journals from the “Tools” button.
For more information, see the step-by-step guide: Create an Item.
-
- Where did my Course menu go? I can only see the entry page?
If you can’t see your Course Menu in your course, you may have expanded the content area and collapsed the Course Menu. This happens frequently on mobile devices and also if you make your browser window too small or increase the text size in your browser too large.
Hover your mouse at the left edge of the screen and check for a right pointing arrow in the area where the Course Menu should be. If you click it, it will expand the Course Menu area and make it visible again
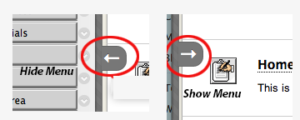
.If you only see three bars in the top left corner of the browser, you have made your window as small as a mobile device and can use those bars to access the main menus and the arrow underneath them to access the course menu.
- How do I see my course as a student sees it?
You can view your course as a student, including submitting assignments and taking tests, and viewing the My Grades area. In your course, there is a button in the upper right, to the left of Edit Mode and Course Styles that looks like a circle with two arrows surrounding it. Click this symbol to enter Student Preview mode. Click Exit Preview in the upper right to exit Student Preview.
More at Using the Student Preview.
Or watch a short video (2:23 minutes) on using the Student Preview
- What types of files can I upload to Blackboard?
You can upload just about any file type to Blackboard, however the type of document that you upload affects how your students can view it. If you upload documents that were created and saved in specific software programs (Word, PowerPoint, Excel, etc.), your students will have to have that particular software installed on their computer to view the documents.
Files that are in .html format will be viewable within the browser. Adobe .pdf files require that users have the Acrobat Reader program, but it’s free and nearly universal.
Media files such as mpeg, mov, avi, wav, aiff, and mp3 require appropriate plug-ins such as Quicktime and Windows Media Player. However, we only recommend that small video / audio files be uploaded directly in the course.
If you use audio and video files in your course, please stream them using Panopto. . See Upload a Video to Panopto for Streaming
- How big a file can I upload to Blackboard?
We do not recommend uploading files larger than 500MB as they will probably take a long time to upload and can take a long time for users to download, that there will be connection timeout issues.
Usually files this large are video files. All video files should be uploaded to Panopto. See Upload a Video to Panopto for Streaming
- Can I move items between folders in my course?
Yes, you can move or copy certain types of items (e.g., text items, files, and discussion forums) between folders in your current course, or to folders in another course. It does not work with items that have a connection to the Grade Center, such as assignments, tests, and surveys.
Next to the item you want to move or copy, use the pulldown menu to choose Copy. On the next screen you will be able to browse to the destination course and folder within that course (including the current course).
For more, see the step-by-step guide: Create Folder/Organize Content.
- How do I re-use or copy content from a previous semester course?
You can copy components of an established course into a new course, or you can export from the previous course and import into the new one. You must be an instructor in both courses to do this. Start by going to the Control Panel of your source course (you will probably have to switch from the Main tab to the Courses tab to find the link to the old course). From the Packages and Utilities menu, choose either Course Copy or Export/Archive course.
For step by step instructions, see Copy or Import Course Content.
- How do I get to my courses from prior semesters?
If you need to access a course from a previous semester, for example to copy materials into a new course, find the course in your Course listing and start there.
- I copied my course materials into my new course, but why didn't the assignments and/or tests show up in the new course?
Because assessments and assignments have links to the Blackboard Grade Center, you have to be sure to click the checkbox for Grade Center Columns and Settings when you copy or import.
For complete step by step instructions on copying or importing, see Copy or Import Course Content.
- How do I copy from my older courses on learn.rochester.edu?
You can copy from any course currently on learn.rochester.edu into your current courses using the Course Copy instructions.
User Management
- How do I add a student or TA to my course?
To add any user to your course that is not enrolled via the automatic process (Registrar’s UR Student enrollment data), go to the Control Panel area of your course’s homepage. Under Users and Groups, choose Users. Do NOT use the search that appears on the Users page. Instead, click the words Find Users to Enroll. Now search for the user, choose the course role and click Submit.
For complete instructions, including a description of Course Roles, see the document Manage Users.
Or, see a video tutorial on adding a user.
Note: TAs can also be added by having them added to UR Student.
- I'm trying to add a student/TA to my course, but they don't show up when I search. Why?
Almost everyone with a UR affiliation should have an account in Blackboard. There are a few reasons why they might not be showing up for you:
1) When you go to Users and Groups/Enroll users, are you using the Search tool that shows up on the first page – the screen called Users? If so, you’re only searching the users already enrolled in your course. To add a new user, go to Users and Groups/Users and click Enroll Users/Find users to enroll. Now search and enroll.
2) The user has at some time been registered for the course, and then dropped it. If that’s the case, the user’s existing enrollment has been disabled, and you cannot add them. You will need to contact your Blackboard support team. Give them the specific user (student ID or NetID if possible) and the specific course in question.
3) The user does not have a Blackboard account. Contact your Blackboard support team. Please supply the user’s first name, last name, and email address, and state whether the user is affiliated with UR or not. If not affiliated with UR, you will need to request a Guest NetID. Please see the next question for details.
- How do I get an account for someone outside the University?
Before requesting an account in Blackboard for someone outside the university system, you will first need to request a Guest AD account for them. That process begins here: http://tech.rochester.edu/services/guest-accounts/
Once a guest AD account has been assigned, contact your Blackboard support team with the guest user name, and a Blackboard account can be generated from that.
Once the Blackboard account has ben created, you can add them into courses: Manage Users.
- I have a student who is registered for my course but is not on my Blackboard roster, or is not seeing my course link in Blackboard.
If you’ve made your course available to students, (see Make your course available), all registered students should see the course link.
If they can’t, or if you’re not seeing the student on your roster, how long ago did the student enroll? Sometimes during the drop/add period it takes a while for enrollments to be reflected in the Registrar data that feeds Blackboard enrollments.
Check your roster in UR Student, or have the student check their registration information in UR Student. Is the enrollment reflected there? If so, it should be in Blackboard within a few hours. Blackboard enrollments are updated from the registrar’s data three times a day.
If the enrollment is delayed and the student needs immediate access to the materials you have in Blackboard, you can enroll the user manually using the step-by-step guide: Manage Users.
Assignments, Assessments and Grading
- How do I create an assignment that students can submit online in Blackboard?
Instructors use Blackboard in two different ways to deliver assignments.
One way is to post a file that the students will view or download and then use that information to complete a task that they will submit in person to the instructor. In that case, this can be accomplished by using the Create Item tool, the same as you would to deliver any static content.
If you want students to have an interface to submit their assignments online, you will need to use the assignment tool. To set up an assignment, enter the content area where you want the assignment to appear and under Assessments, choose Assignment.
For complete instructions, see the step-by-step guide: Create an Assignment.
- Where do I find the students' online assignment submissions for grading?
When you create an assignment in Blackboard, a matching column is automatically created in the Grade Center. To retrieve submissions from an online assignment, go to the Control Panel area of your course homepage and expand the Grade Center link. You can either choose Needs Grading to see a table of items that are ready for grading, or Full Grade Center.
If you chose Full Grade Center, look for the column that matches the assignment you’re looking for. All students who have submitted will have a green exclamation point in their row for that column. Hover your mouse next to the exclamation point icon to reveal a pulldown menu. Choose Grade Details or Attempt[date].
For more information, see the step-by-step guide: Grade an Assignment.
- Hos do students see the My Grades tool in my Blackboard course?
- Hover over the + in the upper left of your Course Menu.
- Choose Create Tool Link.
- Name the link (Grades or My Grades)
- Select My Grades from the pulldown list of tools
- Click Available to Users
- Submit.
- Is there a way to record attendance in Blackboard?
Yes, we have incorporated the Qwickly Attendance tool into our Blackboard implementation. Please see Qwickly Attendance for more information.
- How can I download the Grade Center?
You can download your course Grade Center to Excel.
- Enter the Full Grade Center view
- At the upper right of the screen, above the roster table, is a button called Work Offline
- Click Work Offline to bring up a contextual menu, and choose Download
- The next screen will offer options to choose only certain data to download. Set as desired and click Submit
- Click the Download button on the next screen.
- Blackboard will download an .xlsx file to your local computer.
Blackboard Tools
- How do I make an Announcement?
1. Click the Announcements button.
2. Make sure the Edit Mode switch to “On” (this makes all the editing tools appear).
3. Click the “Create Announcement” button.
4. Enter information as needed and click “Submit.”Note: Announcements will display unless otherwise restricted by a date range, most recent on top.
If you wish for this announcement to be sent out in email, be sure to click the box for “Send a copy of this announcement immediately”.
- How do I send an email?
1. Under Control Panel, use the Course Tools pulldown and choose Send Email
2. Pick the option which best suits your purpose.
3. Enter subject and text, attach file if needed, then click “Submit.”
4. You’ll get a copy of the email in your email inbox.Please note: this is your only record of the email. No record is kept in Blackboard
- Why do some students not get emails I send from my Blackboard course?
When students say they are not receiving emails you send, first have them check their junk folder. In most cases where email is not received, the student will find that their email client is sending Blackboard email to junk.
If that’s not the case, is the email on record in Blackboard correct? You can check by going to the Control Panel area of your course homepage, using the pulldown next to Users and Groups and choosing Users. On the Users screen, search for the student in question. Is the email listed correct?
Or have the student check in Blackboard:
Go to the Personal Profile page (the one with your name) and review the settings.
to change your email, hover over the email and a pencil icon will appear. Click the pencil. Update the email address and click Done.
- How do I get a link to a tool (such as Email, Discussions, My Grades, etc.) to appear on the Course Menu?
You can create Course Menu buttons to take students directly to Send Email, Discussions, My Grades or any of the other Blackboard course tools you are using.
- Hover over the + in the upper left of your Course Menu.
- Choose Create Tool Link.
- Name the link, choose the tool, make it available.
- Submit.
Detailed instructions with screen shots are in Managing the Course Menu.
Other/Portal Features
Strong Memorial Hospital Employee Training
- How do I create a UR Medical Center employee training course?
Refer to the Miner Library Blackboard Support page Resources for Employee Education Instructors and Course Designers for information about getting started, forms, tools, and tutorials.